The refrigerator does not have regular cleaning after a period of use, and there will be an unpleasant smell on the food, which is actually because the bacteria are at work. Timed cleaning not only improves food safety, but also removes odors and gives you a healthy home environment.
Below, the editor will tell you how to clean the refrigerator by removing odor and bacteria.
There are many ways to remove odor
The refrigerator will not be cleaned regularly after using it for a period of time. There will be an unpleasant smell on the food. This is a problem left by the food storage. Here are some good ways to remove the odor.
1 lemon removes odor
Cut a lemon into two halves, do not use any protective film, put the lemon on the top of the refrigerator freezer, and leave it for a week. The fragrance of the lemon can remove the odor from the refrigerator.
2 charcoal to remove odor
The appropriate amount of charcoal is crushed, placed in a small cloth bag, placed in the middle of the refrigerator freezer, and the deodorizing effect is very good.
3 baking soda odor
Take a small amount of baking soda in a wide-mouth glass bottle, open the bottle cap, and place it in the refrigerator freezer. Generally, the odor can be removed in 3 days.
4 towels except odor
Use a clean cotton towel, folded and placed on the edge of the upper shelf of the refrigerator. The tiny holes on the towel can absorb the odor in the refrigerator. After the towel is washed with warm water, it can be used continuously.
5 tea leaves in addition to odor
As a household item, tea can effectively remove odor. The method is to put the tea into the bag and put it into the refrigerator freezer. After a period of time, the odor of the refrigerator can be removed.
6 coffee grounds to remove odor
Some families have the habit of drinking coffee. Now give you a chance to use coffee grounds. Place the dried coffee grounds on the plate and put them in the middle of the freezer. Do not open the refrigerator door freely. After 3 days, the odor can be removed.
Clean bacteria should be safe and careful
Before cleaning the bacteria, be sure to unplug the power supply for safe and clean.
The cleaning of bacteria is actually the cleaning of the dirt in the refrigerator. The refrigerator will produce dirt on the outside and inside. The external dirt can be wiped slowly with a soft cloth and a small amount of toothpaste. If the dirt is stubborn, use more toothpaste and wipe it repeatedly. The refrigerator can be very Quick recovery. The internal dirt can be wiped with diluted bleach to remove stains and sterilize.
The outside of the refrigerator can be cleaned daily with a dry cloth, and the internal cleaning should be frequent to avoid bacteria. It is important to remember that when cleaning, do not rinse with water, so as not to affect the electrical insulation performance, but also the risk of electric shock.
When cleaning the inside of the refrigerator, use a small amount of detergent to wipe the water. After scrubbing, dry it with a dry cloth. The cleaning method of the drawer in the refrigerator is also scrubbed with a small amount of detergent.
When cleaning the refrigerated chamber, first use a rag mixed with detergent to wipe the refrigerated chamber, which can effectively clean the dirt. Then use a clean cloth to filter the refrigerating chamber. The inner chamber of the freezer can be cleaned by cleaning the freezer before, but remember not to use sharp objects to shovel the ice on the evaporator plate, which can easily smash the evaporator and cause the refrigerator to malfunction.
Written in the end: the refrigerator is a product that is used more in home appliances, especially in the summer, we must pay attention to cleaning and sanitation, only pay attention to maintenance in normal use, clean the refrigerator in a timely manner, in order to better use the refrigerator, and in the cleaning Always unplug the power supply when you are in the refrigerator to make it safe and clean.
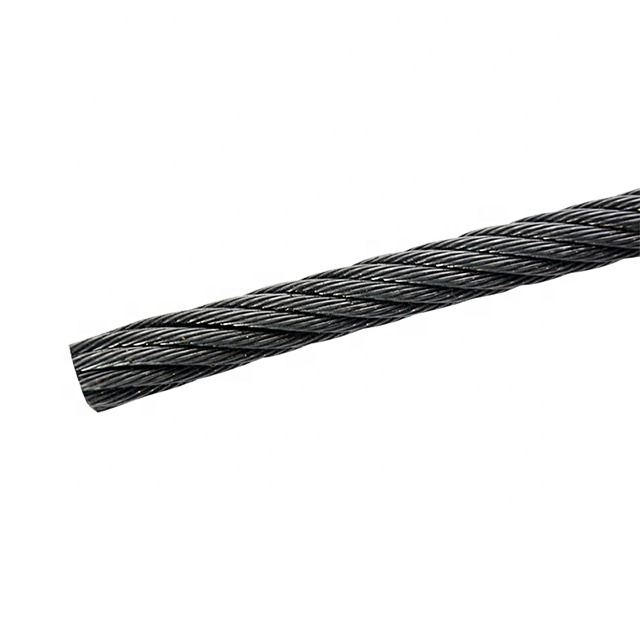
Elevator ropes are highly engineered and made of steel with other composites. Also they are not single wires but several strands of various sizes wrapped together. A typical cable or rope can have over 150 strands of wire precisely designed to be strong, flexible, and give long service. Multiple wire strands are used to increase the life of the cable and give flexibility. When you run a cable over a pulley wheel or sheave, the part of the wire on the sheave makes a shorter trip than the outside of the wire. This stretching over time would create weakness for a single strand. So elevator ropes are flexible strong and give long life if maintained properly.
The types of rope in an elevator can vary depending on the job that they need to do. Here are some of the more common ropes you can find lurking in your hoistway:
1. Hoisting Ropes – These are the ropes you see in all the movies. Several are used to suspend the elevator cab and make the car go up and down. These are also the cables used for the counterweights as the counterweights and elevator car are in the same system. The counterweights do just what they are called; they counter the weight of the elevator car when loaded so it takes less effort to move the car up and down. High-strength ropes are used in high rises due to the required speeds that you see today. For instance the fastest moving elevator car in the world, hits a speed that you would find on freeways; an astounding 45 miles per hour! Ultimately the grade of steel is not only determined by the speed but on the car capacity as well. The heavier the weight the car can lift, the higher strength required.
2. Governor Ropes – A governor is part of elevator safety that you will find in the hoistway or overhead space. The second that an elevator car starts falling or even rising too fast, the governor triggers the safety mounted on the car frame and brings the car to a halt. The governor rope runs over the governor sheave and down to the elevator car and is attached to the safety trip mechanism. The governor rope continues all the way down to the pit and runs under a sheave down there and then makes the journey back to the governor. This governor rope arrangement forms a continuous loop while the elevator moves up and down the hoistway. If the car starts going too fast, centrifugal force pushes flyweights outward in the governor against the spring. In simplistic terms it tells the brakes to kick in and stops the car from falling or rising too quickly. As this entire safety system relies on the governor rope, it is very important that it is reliable and in great working condition.
3. Compensating Ropes – Turns out that all of the cable or rope to make an elevator car go up and down is really heavy. This is especially true for really tall buildings. Think about this; a standard one inch elevator cable can weigh 1.85 pounds per foot. As elevator cable makes several trips up and down the hoistway, this weight can really add up. So compensating ropes [compensate" for all the weight of the hoisting ropes on the car or counterweight side. Probably any elevator that exceeds 100′ of travel needs these ropes that are connected to the sling that holds the car and the counterweight frame.
The most important thing about any elevator rope is that they must be in good operating condition at all times. This means inspected often. The technician when performing routine checks doesn`t just look up the hoistway, nod their head and move on; they must check the ropes closely for proper tension, any wear patterns, the diameter of the rope, any rusting, pitting or breaks in strands, the sheaves, proper lubrication and connections.


Elevator Cable,Elevator wire rope,Lift ropes,governor rope,Elevator steel wire rope,Elevator steel cable
Suzhou Keffran Parts Co.,ltd , https://www.keffran-elevatorsmart.com